Deploying Jitsi Meet via Portainer on Synology
This guide provides a template for running Jitsi Meet on a Synology NAS using Docker Compose and setting up a secure Reverse Proxy.
1. Prepare the File System
Create the following directory structure in your Synology File Station to ensure data persistence:
/volume1/docker/jitsi-meet/config/prosody/volume1/docker/jitsi-meet/config/jicofo/volume1/docker/jitsi-meet/config/jvb/volume1/docker/jitsi-meet/config/web
2. Configure Environment Variables (.env)
In Portainer, use the Advanced Mode to paste your configuration. Ensure PUBLIC_URL matches your domain.
JICOFO_AUTH_USER=jicofo_user
JICOFO_AUTH_PASSWORD=strong_password_1
JVB_AUTH_USER=jvb_user
JVB_AUTH_PASSWORD=strong_password_2
JIGASI_XMPP_USER=jigasi_user
JIGASI_XMPP_PASSWORD=strong_password_3
JIBRI_XMPP_USER=jibri_user
JIBRI_XMPP_PASSWORD=strong_password_4
DOCKER_HOST_ADDRESS=192.168.1.XX  # Your NAS IP
PUBLIC_URL=https://jitsi.myserver.com
XMPP_SERVER=prosody
3. Create the Portainer Stack
Copy this YAML into your Portainer Stack editor.
services:
    prosody:
        image: jitsi/prosody:stable
        hostname: xmpp.meet.jitsi
        restart: unless-stopped
        expose: [ '5222', '5347', '5280' ]
        volumes:
            - /volume1/docker/jitsi-meet/config/prosody:/config
        environment:
            - TZ=America/New_York
            - JICOFO_AUTH_USER=${JICOFO_AUTH_USER}
            - JICOFO_AUTH_PASSWORD=${JICOFO_AUTH_PASSWORD}
            - JVB_AUTH_USER=${JVB_AUTH_USER}
            - JVB_AUTH_PASSWORD=${JVB_AUTH_PASSWORD}

    jicofo:
        image: jitsi/jicofo:stable
        restart: unless-stopped
        depends_on: [ prosody ]
        volumes:
            - /volume1/docker/jitsi-meet/config/jicofo:/config
        environment:
            - XMPP_SERVER=${XMPP_SERVER}
            - TZ=America/New_York
            - JICOFO_AUTH_USER=${JICOFO_AUTH_USER}
            - JICOFO_AUTH_PASSWORD=${JICOFO_AUTH_PASSWORD}

    jvb:
        image: jitsi/jvb:stable
        restart: unless-stopped
        depends_on: [ prosody ]
        ports:
            - '10000:10000/udp'
        volumes:
            - /volume1/docker/jitsi-meet/config/jvb:/config
        environment:
            - TZ=America/New_York
            - XMPP_SERVER=${XMPP_SERVER}
            - DOCKER_HOST_ADDRESS=${DOCKER_HOST_ADDRESS}
            - JVB_AUTH_USER=${JVB_AUTH_USER}
            - JVB_AUTH_PASSWORD=${JVB_AUTH_PASSWORD}

    web:
        image: jitsi/web:stable
        restart: unless-stopped
        ports:
            - '8001:80'
        depends_on: [ prosody, jicofo ]
        volumes:
            - /volume1/docker/jitsi-meet/config/web:/config
        environment:
            - TZ=America/New_York
            - PUBLIC_URL=${PUBLIC_URL}
            - XMPP_SERVER=${XMPP_SERVER}
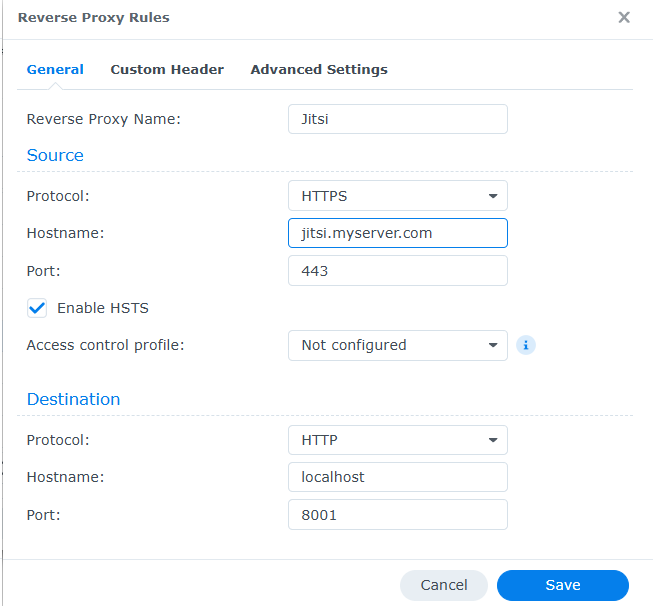
4. Setup Synology Reverse Proxy
To enable HTTPS and secure access, go to Control Panel > Login Portal > Advanced > Reverse Proxy.
General Settings
Configure the source to your public domain and the destination to your local Jitsi web port (8001).
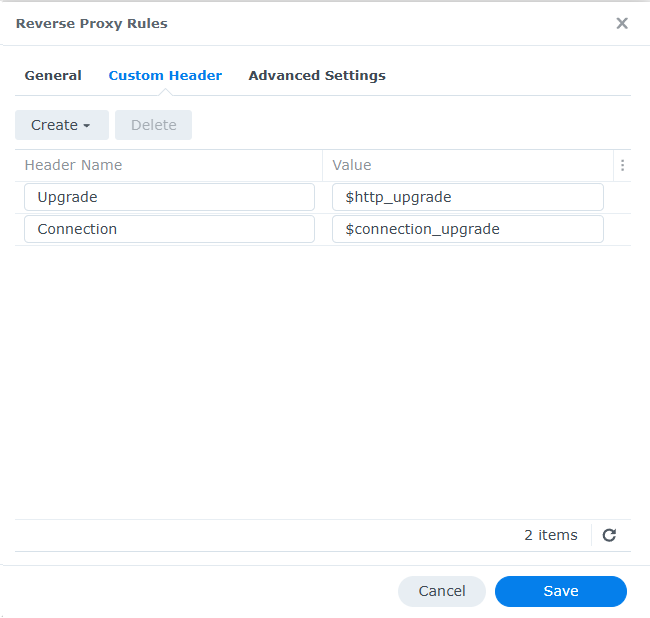
Enabling WebSockets (Required)
Jitsi requires WebSocket support to function. Go to the Custom Header tab, click Create, and select WebSocket. This automatically adds the Upgrade and Connection headers.
Important: Ensure port
10000/UDP is forwarded on your router to your NAS IP. Without this, users will connect but will not see or hear each other.